
Introduction
This is a bit of a minefield topic, as there are a lot of plugins and ‘solutions’ out there that require you to pay money or install bloated software to accomplish something WordPress is designed to handle.
In this post, I will show you how to have WordPress generate specific sizes for your images that you can tailor to match your content width. This will maximise page load speeds and save users from consuming unnecessary data.
Determine Your Required Image Sizes
Before you can define the new image sizes you want WordPress to use, you must first establish the size of your content (if you don’t already know it).
The easiest way to do this is to inspect a full-width element on your page and check the rendered width. Here, you can see me doing this in a blog post I’ve written (Remove the ‘Website’ field from the WordPress comment form), and I’m also highlighting the size of the section and the size of the image being loaded:
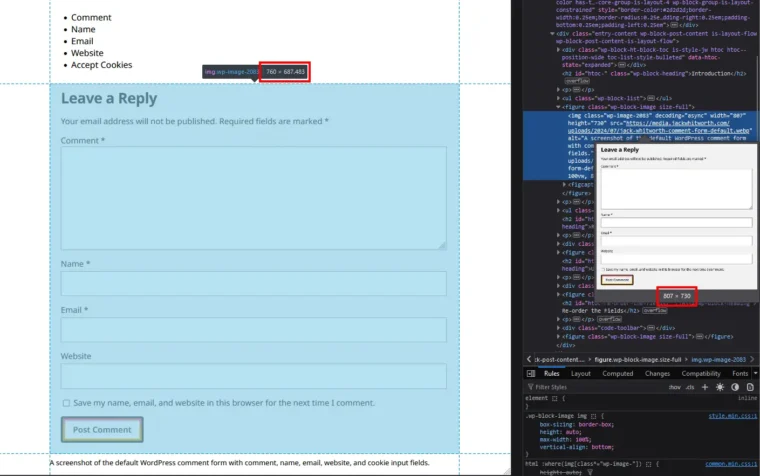
As you can see, the rendered width of the page is 760 pixels and the image itself is 807 pixels wide.
Register New Image Sizes In WordPress
To register new sizes, you must add PHP code to your website’s theme. The easiest way to do this is to add it to the functions.php file. I will assume you know how to do this.
// Add the new size for the thumbnail generation
\add_image_size( 'medium_cropped', 300, 300, true );
\add_image_size( 'content_width', 760, 0, false );
\add_image_size( 'project_background', 470, 440, true );

/**
 * Registers the custom sizes for use in Gutenberg
 */
function customImageSizes( array $sizes ): array
{
    $sizes['medium_cropped'] = __( 'Medium Cropped' );
    $sizes['content_width'] = __( 'Content Width' );
    $sizes['project_background'] = __( 'Project Background' );
    return $sizes;
}
\add_filter( 'image_size_names_choose', 'customImageSizes' );
In the above example, I’m creating a few different sizes:
medium_croppedcontent_widthproject_background
This gives you a few examples of how this should look.
I’d recommend reading WordPress’ documentation on the add_image_sizes hook.
The one I’ve set up to solve the width issue for my content is the content_width size.
First, add_image_size is used to define the name, width, height, and whether the image should be cropped. If you set the height as 0, this means that the height can be dynamic, and will be set automatically based on the original image’s width.
Next, the image_size_name_choose filter is used to register these new sizes as choices within the Gutenberg editor. This will allow you to select your new sizes within your image blocks.
Regenerating Thumbnails
WordPress only generates image variations when an image is first uploaded. This means that once we register new sizes, we need WordPress to go back and regenerate all of the existing media. Without doing this, our new image sizes will only benefit new content.
There are two approaches for regenerating thumbnails:
Regenerate Thumbnails with WP CLI
If you have WP CLI installed and are comfortable with the command line, you can use the following commands to regenerate thumbnails:
# regenerate all thumbnails
wp media regenerate --yes
# regenerate thumbnails for specific images by passing IDs
wp media regenerate 123 124 125Regenerate Thumbnails Plugin
Alternatively, you can use the Regenerate Thumbnails plugin.
Once installed and activated, you’ll find the options available under the ‘Tools’ section of your admin dashboard.
This works just as well but requires installing the plugin. It’s worth noting that this will also take longer to run than using WP CLI.
Updating Image Gutenberg Block
With your new image sizes defined, and all of the new image sizes generated, it’s now time to utilise them.
Select your image block within the Gutenberg editor, and you’ll see the ‘Resolution’ option to select an image size. Here, I’m now going to set mine as the content_width size I defined earlier:

With the new resolution set, we’re all done.
Checking It Works
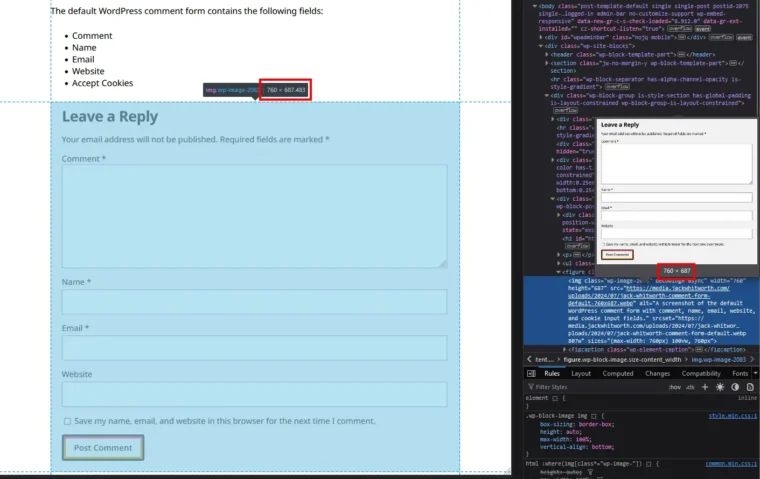
Going back to the same post as before and inspecting the same image, you’ll now see that the image displays at the same 760-pixel width that the content is rendered at:
Closing Thoughts
I personally really like this approach as an effective solution. Personally, I don’t like tinkering too much with WordPress defaults. While it’s possible to edit the default sizes included with WordPress and have these regenerated, keeping my modifications separate maintains the integrity and compatibility of the website as a whole.
The downside here is that you have to remember to set the widths on the images as you insert them. Additionally, if you have a large backlog of posts, you’ll have a lot of editing to do to update them. With these drawbacks in mind, it’s up to you whether this solution is appropriate.
Using the methods described here, you can also generate images for more than just the content width. For example, the project_background size I created in my example belongs to this section on my homepage:
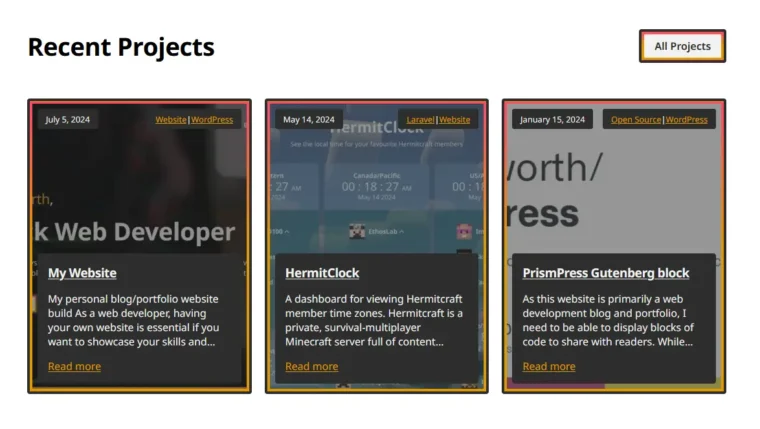
As these background images are an odd size and aspect ratio, I’ve generated cropped images that match the largest size these render at. By doing so, I’m improving the load times dramatically by having appropriate backgrounds only.
Thank you for taking the time to read this article. If you’re interested in taking your WordPress websites to the next level, I’d recommend reading through some of my other WordPress posts.
Leave a Reply