

What is Divi and Swift, and what is our goal?
I use the Divi theme for the majority of my WordPress websites. It’s well-supported, widely used, and actively developed, and it makes it easy for someone like myself who isn’t a front-end developer to produce modern websites with minimal headaches. The biggest downside of the Divi WordPress theme is that it can be quite bloated and slow, especially if you don’t follow best practices for optimal website speeds.
Swift Performance 2 is one of many page caching plugins available for WordPress. It has excellent high-end features such as minifying and merging scripts and style sheets, optimising images and their delivery, optimising the database, and controlling which plugins are loaded on each page to avoid loading unused code. However, if you’ve ever tried using Swift Performance 2 alongside the Divi theme in WordPress, you might have encountered issues with elements of the website breaking slightly due to various settings, such as the above-mentioned script merging and minifying.
In this article, you’ll see my exact configurations for Swift Performance 2. These settings are ones that I’ve landed on using for all of my Divi WordPress websites after using both Swift and Divi almost exclusively for the last 2 years. These settings are the ones I’ve landed on after many hours of trials and testing all to ensure the absolute best possible speeds while preserving all of Divi’s functionality.
Software versions used for this guide
To ensure that the advice I provide applies to you, I’ve provided the versions of the software in use as of writing this guide. Before applying any of the suggested actions below, please check to see that you’re on (at the very least) the same major versions of the various software listed below. Otherwise, it’s possible that some of the advice could be out-of-date or not applicable to your specific set-up. I offer no warranty and accept no responsibility for any changes you make to your websites from the advice provided in this article. This article was posted on 29th June 2023 and has not had any updates since.
| Software | Version |
|---|---|
| WordPress | 6.2.2 |
| PHP | 8.2.6 |
| Divi | 4.21.0 |
| Swift Performance 2 | 2.3.6.13 |
Setting up Divi
Before diving in with Swift Performance 2’s settings, we must first ensure that we have a few things set up correctly in Divi itself. Here’s a rundown of the settings I have in place on Divi to work alongside my Swift Performance 2 configuration:
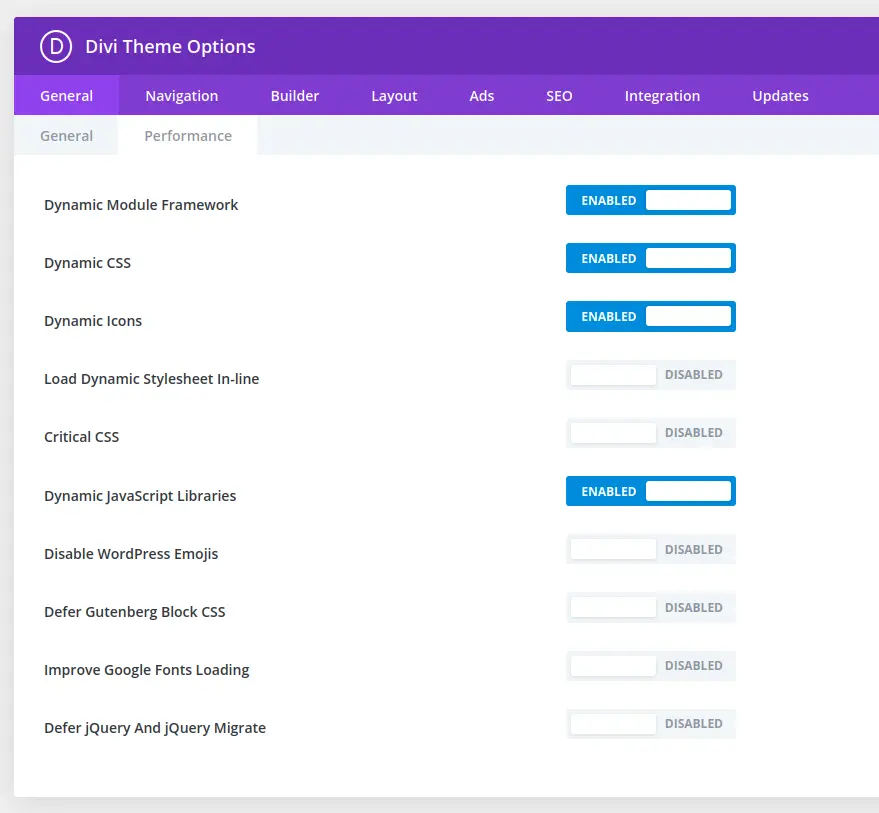
- General
- Performance
- Dynamic Module Framework: Enabled
- Dynamic CSS: Enabled
- Dynamic Icons: Enabled
- Load Dynamic Stylesheet In-line: Disabled
- * Critical CSS: Disabled
- Dynamic JavaScript Libraries: Enabled
- * Disabled WordPress Emojis: Disabled
- * Defer Gutenberg Block CSS: Disabled
- * Improve Google Fonts Loading: Disabled
- * Defer jQuery And jQuery Migrate: Disabled
- Performance
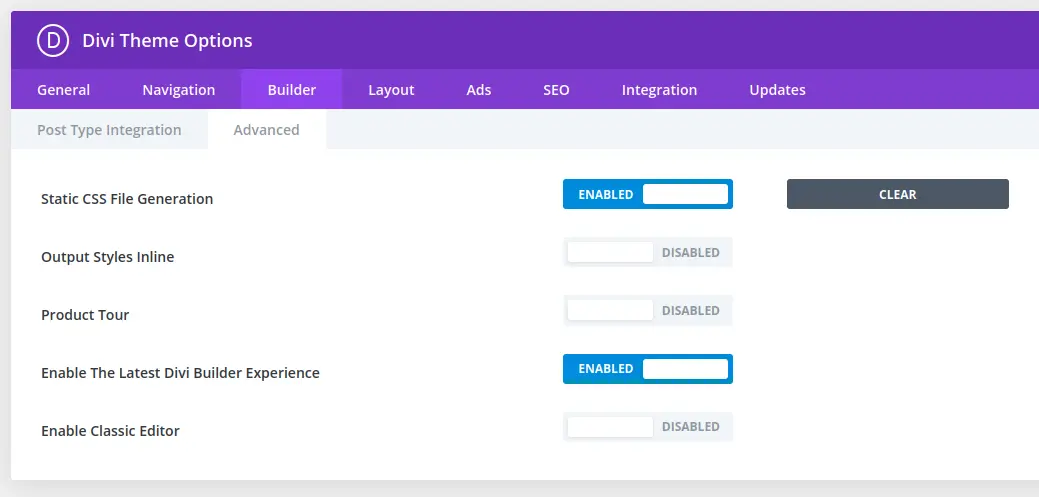
- Builder
- Advanced
- Static CSS File Generation: Enabled
- Output Styles Inline: Disabled
- Advanced
* Handled within Swift Performance 2
Setting up Swift Performance 2
Now that you have the correct settings enabled in Divi, please install your copy of Swift Performance 2. The following tips may also apply to Swift Performance Lite, but the provided screenshots are from the premium versions and may differ slightly from Swift Lite.
- Optimization
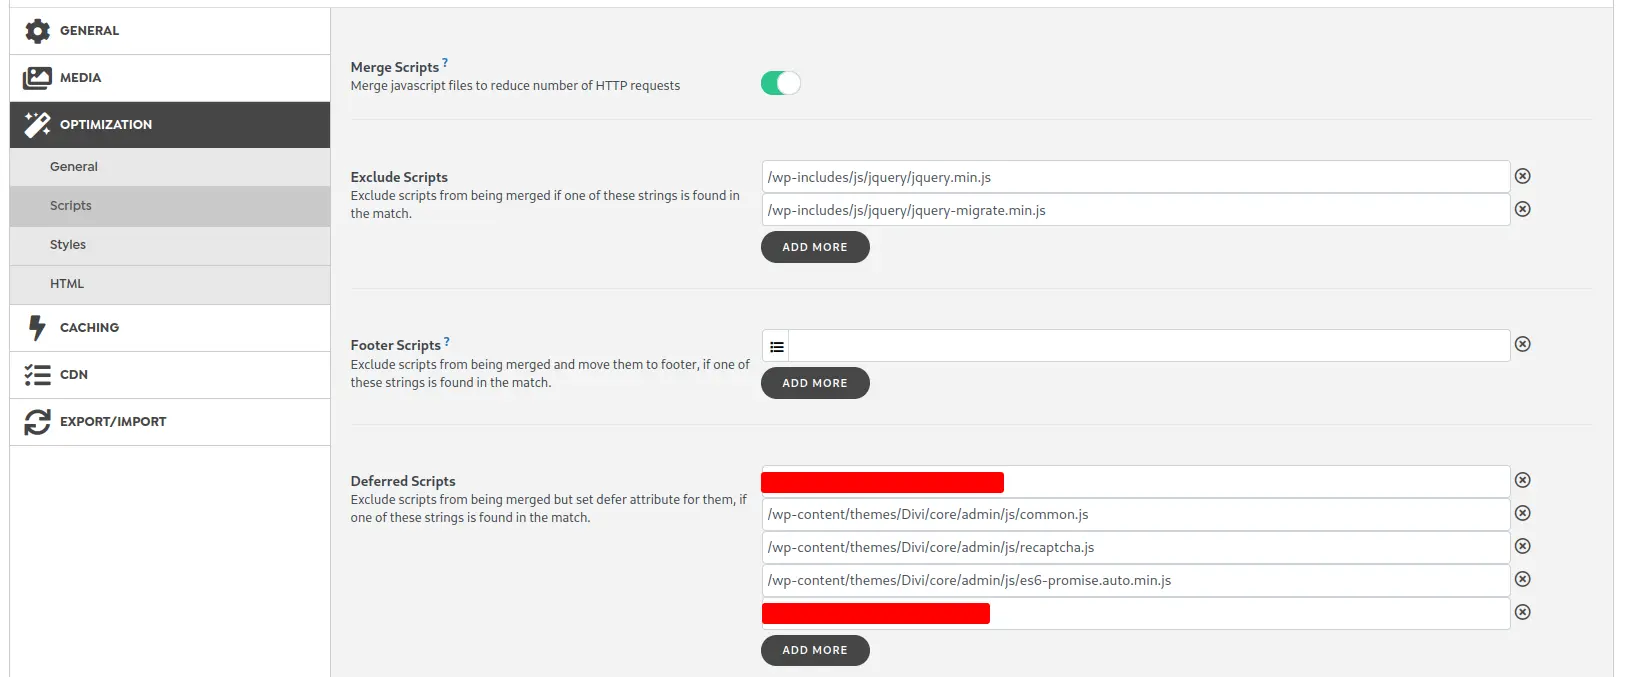
- Scripts
- Merge Scripts: Enabled
- Exclude Scripts:
- /wp-includes/js/jquery/jquery.min.js
- /wp-includes/js/jquery/jquery-migrate.min.js
- Deferred Scripts:
- /wp-content/themes/Divi/core/admin/js/common.js
- /wp-content/themes/Divi/core/admin/js/recaptcha.js
- /wp-content/themes/Divi/core/admin/js/es6-promise.auto.min.js
- Minify Javascripts: Enabled
- SeparateScripts: Enabled
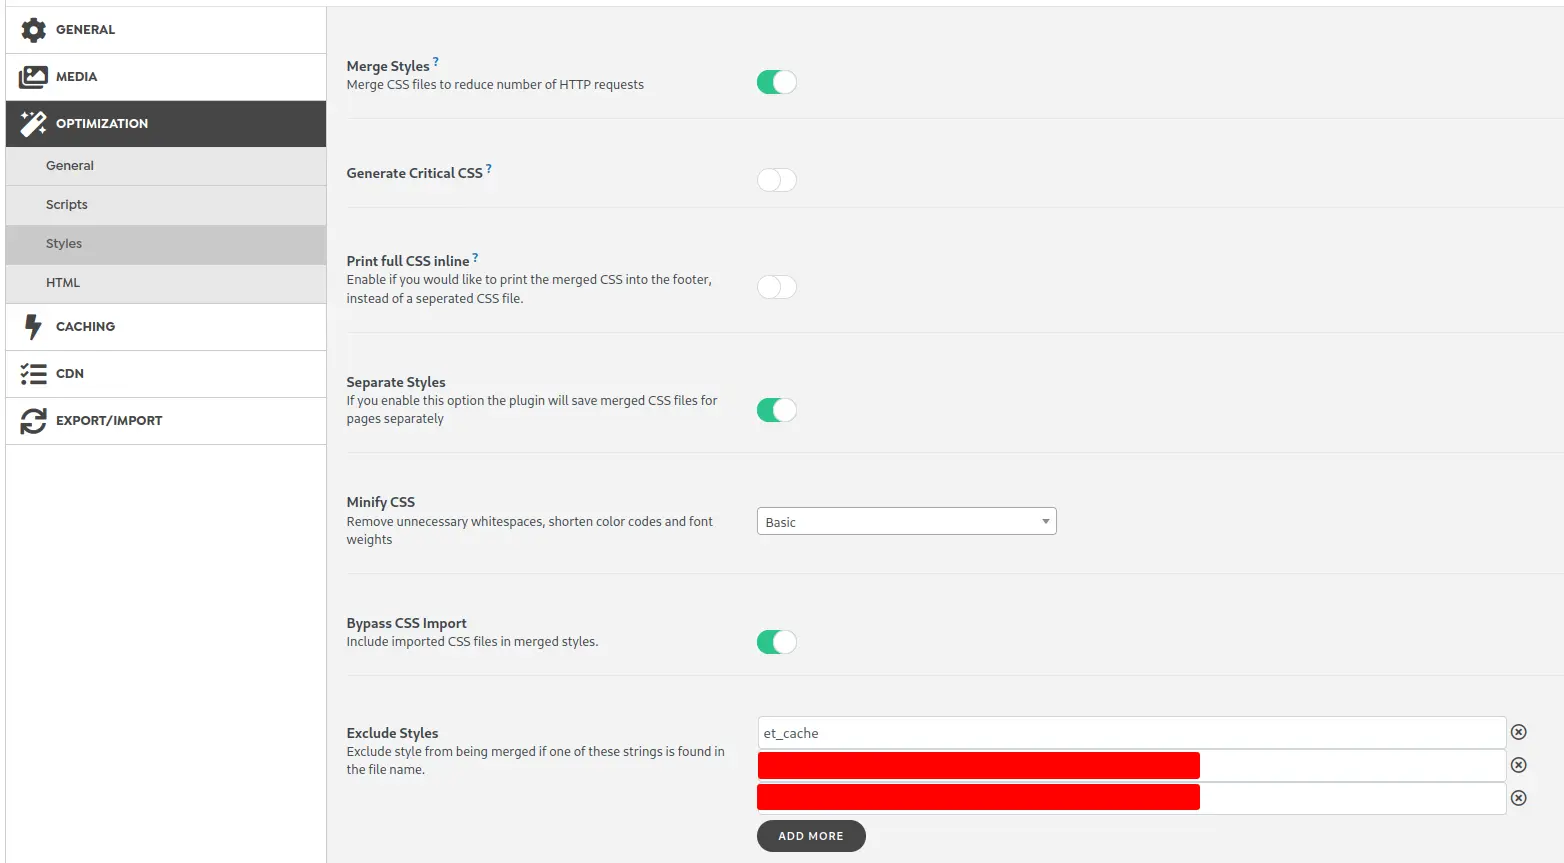
- Styles
- Merge Styles: Enabled
- Generate Critial CSS: Disabled
- Print full CSS inline: Disabled
- Separate Styles: Enabled
- Minify CSS: Basic
- Bypass CSS Import: Enabled
- Exclude Styles:
- et_cache
- Scripts
With these settings in place, Swift Performance 2 will minify and merge all CSS and Javascript, excluding only those that would otherwise cause issues in Divi’s functionality. It’s worth noting that you should ensure caching is disabled for logged-in users to ensure a smooth experience while using Divi Builder.
One final tip here is to navigate to Caching > Exceptions, then under “Exclude Post Types”, add anything that begins with ‘et_’. This will stop the warmup tabled from adding the various post types generated by Divi under the hood.
Note: Under Caching > Exceptions, in the ‘Exclude Post Types’ box, I’d recommend adding all post types belonging to Divi. These will begin ‘et_’. This stops the warm up table being bloated with templates and such that don’t need to (or can’t) be cached.
Testing our new settings
Now that everything is installed and ready to go, it’s time to validate that everything’s working. First, navigate to Swift’s Dashboard, and scroll down to the warmup table:
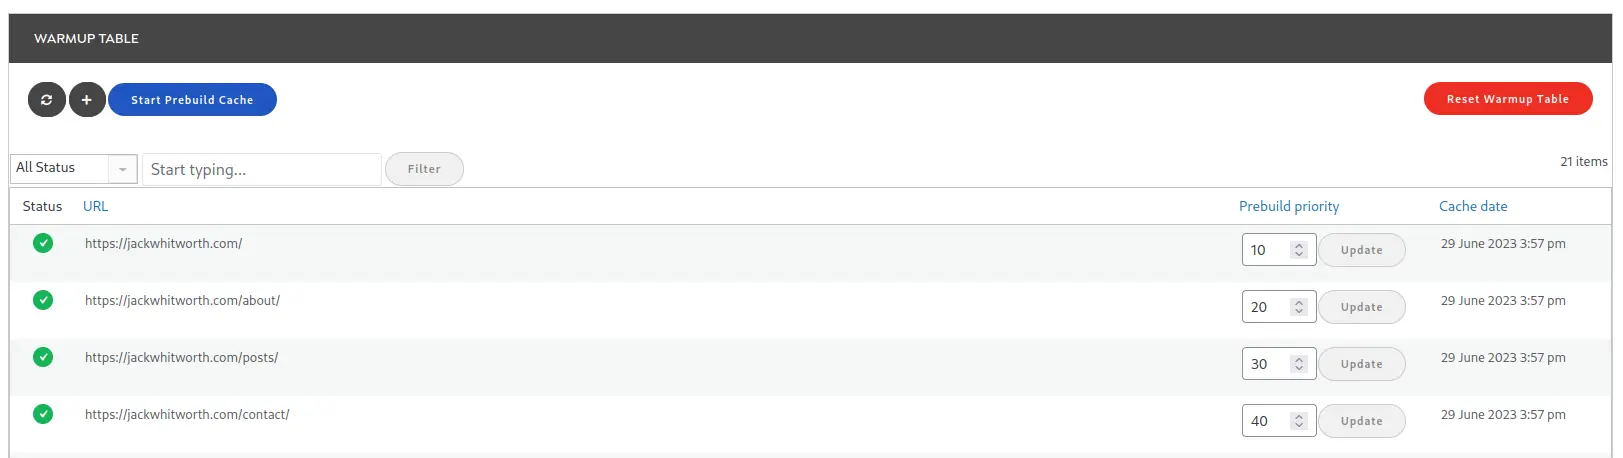
In the above screenshot, you’ll see that it’s listed the pages available on my website, alongside information such as the status and when it was cached. If you’ve just cleared your cache you may see a few red crosses instead of green ticks, just be patient as it will still be building. Depending on the size of your website and the hosting plan you use, this process could take a little while.
Once the cache is built, open up an incognito / private browsing tab (this ensures that you’re not logged in to the website and that browser cache isn’t used), then go to your website. Once you’re on your website, browse it like normal as if you were a customer or reader viewing it for the first time. This form of exploration testing allows you to ensure that everything is functioning as intended.
If everything looks okay, open up your browser’s developer tools (usually accessible via the f12 hotkey, or by right-clicking on the page and clicking ‘Inspect’) and open the networking tab. With this tab open, you can refresh your page and check to see how many requests are being made for scripts and stylesheets. Depending on the other exceptions you may have in place, you should expect to only see a couple there.
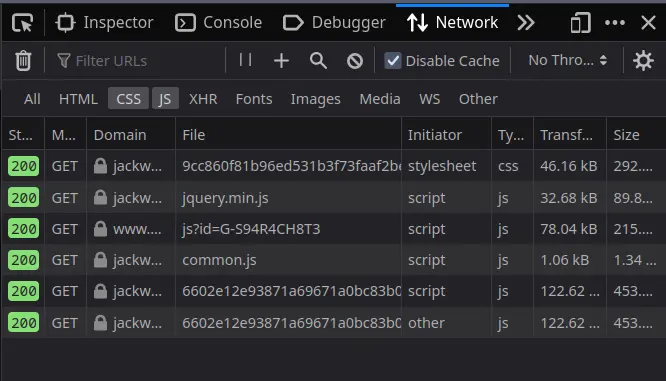
As you can see from my screenshot above, when filtering for CSS and JS files, and disabling browser cache, only 6 requests are required for my homepage to load. There are 5 Javascript files and only 1 CSS file. This is a great result compared to the 16+ it is without Swift configured.
Conclusion
I love both Swift Performance 2 and the Divi theme. They’re both very powerful and are tools I utilise every day in my management of WordPress websites. While these configurations can take a few minutes to implement the first time you do it, they will save a huge amount of bandwidth and time for your end users, giving them much greater experiences on your website. Additionally, Google and other search engines love fast websites, so why not make sure yours is as fast as possible without compromising by switching themes?
If you’re interested in Swift, check out my last post where I benchmarked Swift Performance 2 against their new Swift AI plugin, as well as WP Rocket.
Leave a Reply