

Introduction
If, like me, you enjoy writing custom plugins for WordPress, you may know the daunting feeling of managing the versions of your plugins across many websites. While you can use a PHP package manager like Composer for your plugins, this isn’t appropriate for most WordPress deployments. For most, using WordPress’ interface to install and update plugins is the norm. That leaves you two options; get your plugin added to WordPress’ repositories or host it yourself. This post will focus on the latter, showing you how to set up your plugin to automatically detect when new versions are available and install them directly from GitHub.


Before You Start
Before starting with getting this set up, you should first make sure that you have all of the following:
- A working WordPress plugin. This should be installed and activated in WordPress without errors.
- A public GitHub repository for the plugin which contains the source code.
This post will also assume you have a working understanding of GitHub, PHP and WordPress.
Finally, I’d recommend you read through the full post before trying to follow along with the advice.
How Does WordPress Update Plugins?
The WordPress Repository
For most plugins, the WordPress repository takes care of everything. Developers will send their plugins for approval by the WordPress team and, once allowed, their plugins will go onto the marketplace. This approach isn’t for everyone though. To maintain the quality of the community software available on WordPress, developers must adhere to various standards and best practices in their plugins. Failure to comply with and maintain their plugins to these standards will result in them being removed from the repository.
Self Hosting
For self-hosted, updateable plugins, things are slightly different. While you get more freedom in your code, you must supply the code that handles the updating. This can be as complicated or as simple as you want. For some, however, this can be daunting.
The approach is actually quite simple. There are a few parts to this, but this is the full process:
- In your plugin’s code:
- With PHP, use the
pre_set_site_transient_update_pluginshook to call a function. - In this function, send a network request to check the latest version of the plugin.
- Compare the latest version to the current version and, if it’s newer than what’s installed, return the details of the latest version.
- Create a JSON file that contains information about the latest plugin version.
- With PHP, use the
- In your GitHub repository:
- Create a new release for the latest plugin version.
- Upload the installable
.zipfile into the latest release.
You don’t have to use GitHub for this, but GitHub will be used for this demonstration.
How To Make Your Plugin Update In WordPress
I’m going to be using my plugin PrismPress. PrismPress is a lightweight Gutenberg block which uses Prism.js for code syntax highlighting. It’s what I’m using in this very article! I built it after being unable to find another plugin out there that offered syntax highlighting without all of the unnecessary admin screens and settings.

You can see the repository for it here for referencing the code.
Step 1: Create JSON File Detailing Your Plugin’s Version
In the main folder of your plugin, you will need to create update-info.json.
This doesn’t have to be in the main folder, but this guide will assume it is. If you choose to place this file somewhere else, you must account for that moving forward.
For PrismPress at the time of writing this post, it looks as follows:
{
    "new_version": "1.3.1",
    "url": "https://github.com/jmwhitworth/PrismPress",
    "package": "https://github.com/jmwhitworth/PrismPress/releases/download/v1.3.1/prismpress.zip"
}
You’ll see that this has 3 keys:
new_version: This should represent the current version of the plugin.url: This is a URL from which you can read about the plugin.package: This should point to a ZIP file which is installable for WordPress. I’ll cover how we get this URL in step 4.
Step 2: Create The Callback Function For Checking Updates
You can do this in any PHP file within the plugin. For PrismPress, I just put this into the main entry file. The main entry file in my example is prismpress.php.
Here’s the full code for the callback function, using the pre_set_site_transient_update_plugins hook:
/**
 * Plugin updater handler function.
 * Pings the Github repo that hosts the plugin to check for updates.
 */
function prismpress_check_for_plugin_update( $transient ) {
    // If no update transient or transient is empty, return.
    if ( empty( $transient->checked ) ) {
        return $transient;
    }

    // Plugin slug, path to the main plugin file, and the URL of the update server
    $plugin_slug = 'prismpress/prismpress.php';
    $update_url = 'https://raw.githubusercontent.com/jmwhitworth/PrismPress/refs/heads/main/update-info.json';

    // Fetch update information from your server
    $response = wp_remote_get( $update_url );
    if ( is_wp_error( $response ) ) {
        return $transient;
    }

    // Parse the JSON response (update_info.json must return the latest version details)
    $update_info = json_decode( wp_remote_retrieve_body( $response ) );

    // If a new version is available, modify the transient to reflect the update
    if ( version_compare( $transient->checked[ $plugin_slug ], $update_info->new_version, '<' ) ) {
        $plugin_data = array(
            'slug'        => 'prismpress',
            'plugin'      => $plugin_slug,
            'new_version' => $update_info->new_version,
            'url'         => $update_info->url,
            'package'     => $update_info->package, // URL of the plugin zip file
        );
        $transient->response[ $plugin_slug ] = (object) $plugin_data;
    }

    return $transient;
}
add_filter( 'pre_set_site_transient_update_plugins', 'prismpress_check_for_plugin_update' );
To use this code, you’ll need to make the following tweaks:
- On line 12, you’ll see the
$plugin_slugisprismpress/prismpress.php. This is the plugin’s folder name followed by the main entry file. - On line 13,
$update_urlishttps://raw.githubusercontent.com/jmwhitworth/PrismPress/refs/heads/main/update-info.json. This will point to theupdate-info.jsonfile we created above. - On line 27, change the
slugto match your plugin. For my example, this was justprismpress.
The code is well commented, but here’s a quick run-through for those who want a full understanding of what’s happening:
- First, this checks if the update transient has already been checked. If it has, it skips.
- We declare the location of the main plugin file and the remote file which houses the information about the latest version.
- The remote file is fetched via
wp_remote_get, retrieving the content. If the fetch is successful, it’s converted into a useable object. - We compare the version of the remote file to that of our main plugin file.
- If the remote file is a higher version, we store this as a response in the transient.
- The transient is returned. WordPress handles the rest from here and will show the user that an update is available.
Step 3: Create A ZIP Of Your Plugin
This will vary depending on your operating system, but as a Windows user, this is how I zip my code. You will need to look this up for your own platform if you don’t already know how to do so.
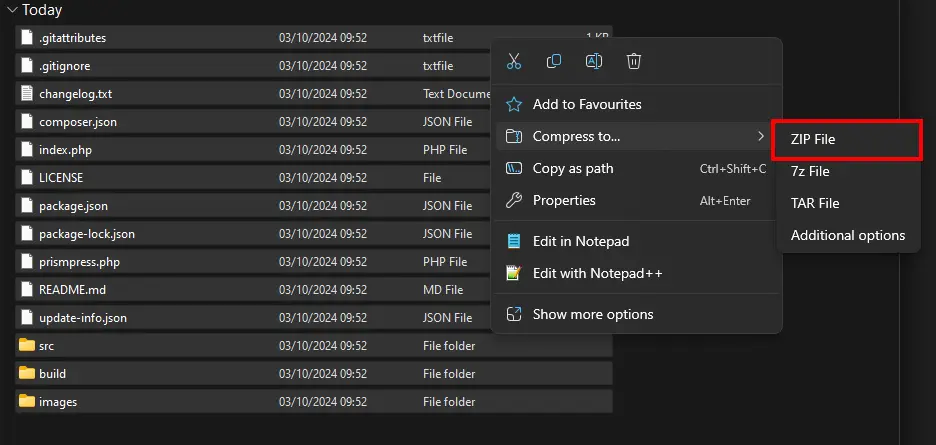
In File Explorer, I’ve navigated to the folder containing all my plugin’s code. This should perfectly match what is on the GitHub repository.
By highlighting all of the files and then right-clicking, I can choose to compress everything into a ZIP file:
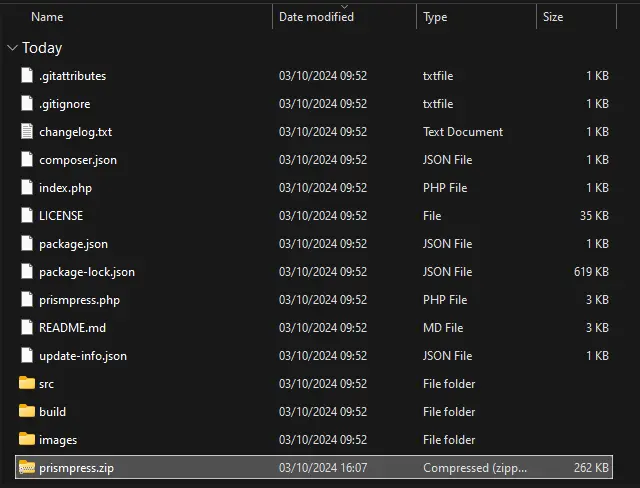
This creates the ZIP file, but you must rename it to match the name of the plugin’s folder in WordPress. Here you can see that mine is now called prismpress.zip:
There are a few essential things that you must ensure:
- The name of the ZIP file must match the name of the plugin’s folder in WordPress. When WordPress unzips and installs this, the resulting folder will take on the name of the
.zipfile. If the name is different, this will cause the plugin to get deactivated and will break the file locations we gave in step 2. - The file must directly contain the plugin files, with no nested parent folder. By this, I mean that when it’s extracted, a folder sharing the same name should appear, and this should contain all of the plugin files. This is how WordPress expects the files to be structured. If this is not done correctly, auto-updating will not work.
Step 4: Creating A Release on GitHub
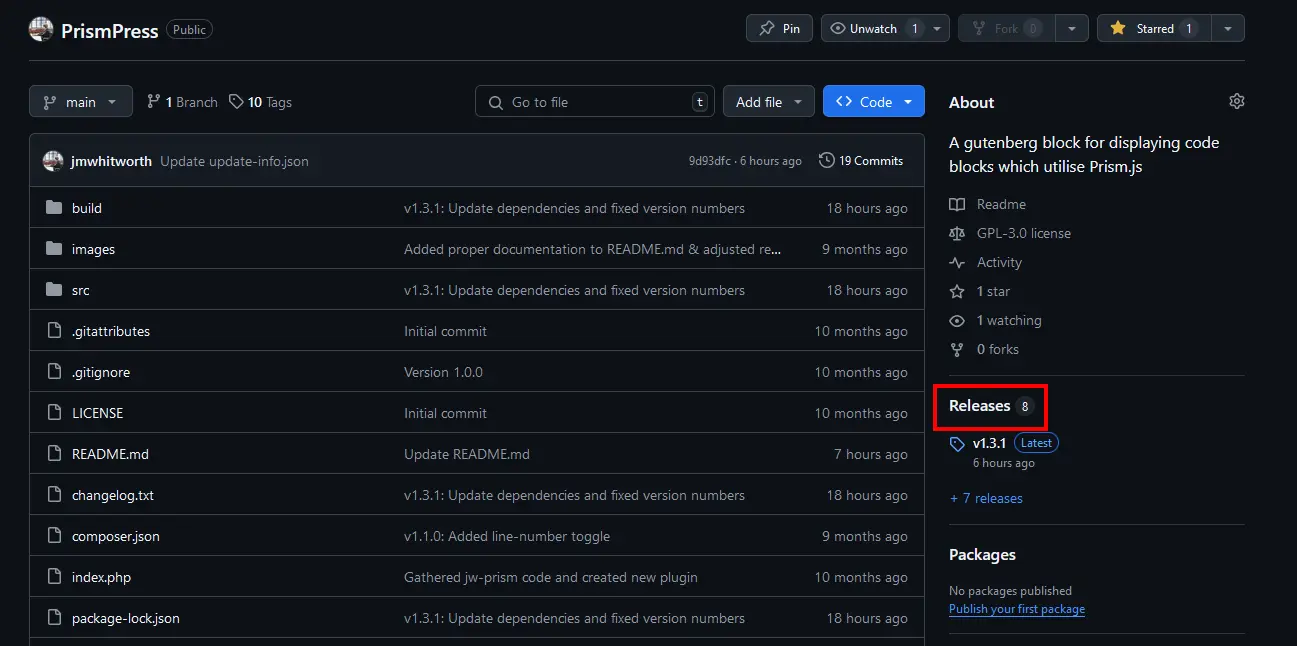
Now that the plugin has the required files for handling updates, we need to deploy it to GitHub. If you load up your GitHub repository for the plugin, you’ll see a ‘Releases’ option on the right-hand side of the page:
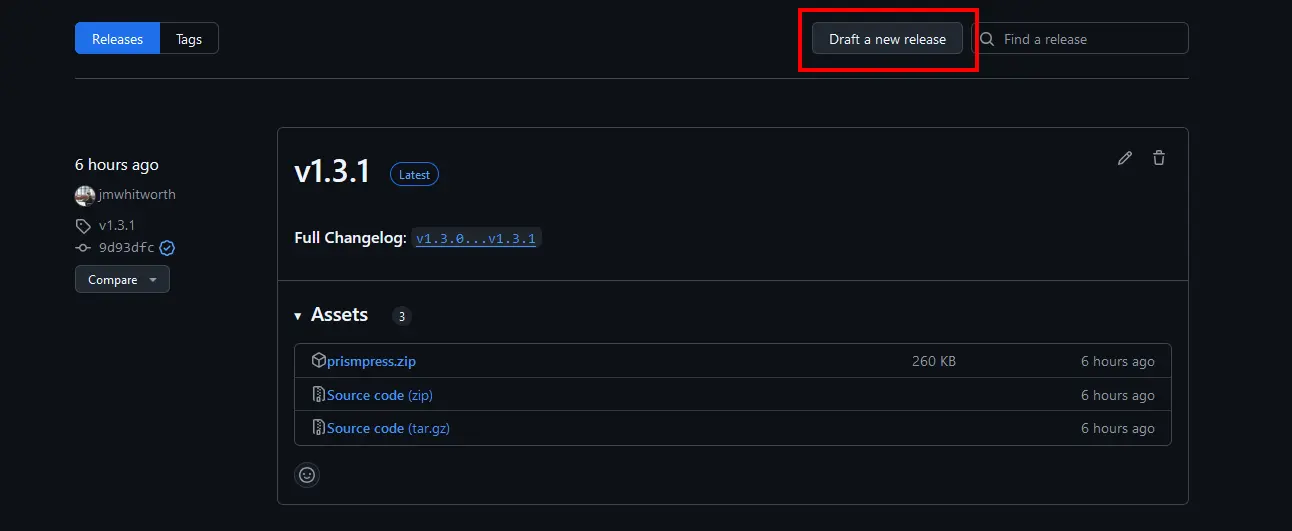
On the Releases page, you can then ‘Draft a new release’:
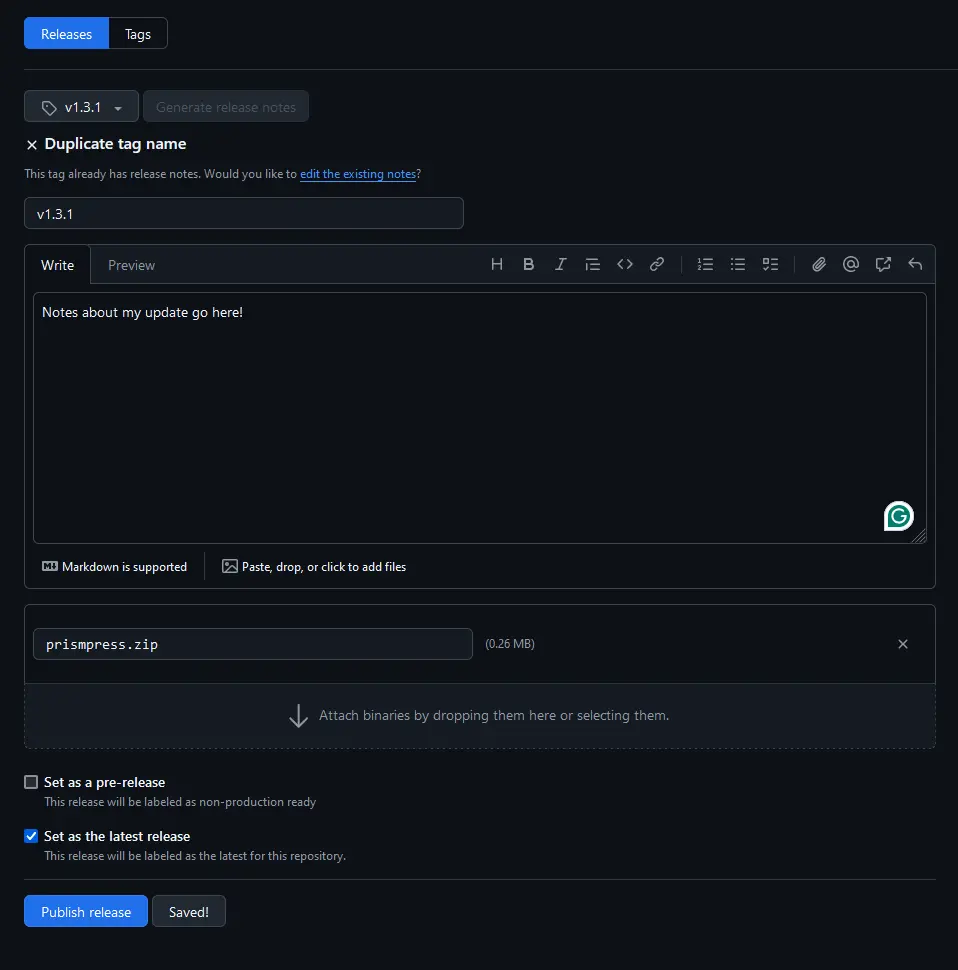
You can then create a tag, title and description.
You must then upload your zipped plugin file by using the ‘Attach binaries by dropping them here or selecting them’ field.
Once your ZIP is uploaded, you should have something like this (minus the ‘Duplicate tag name’, as I was recreating something that already existed for this demo):
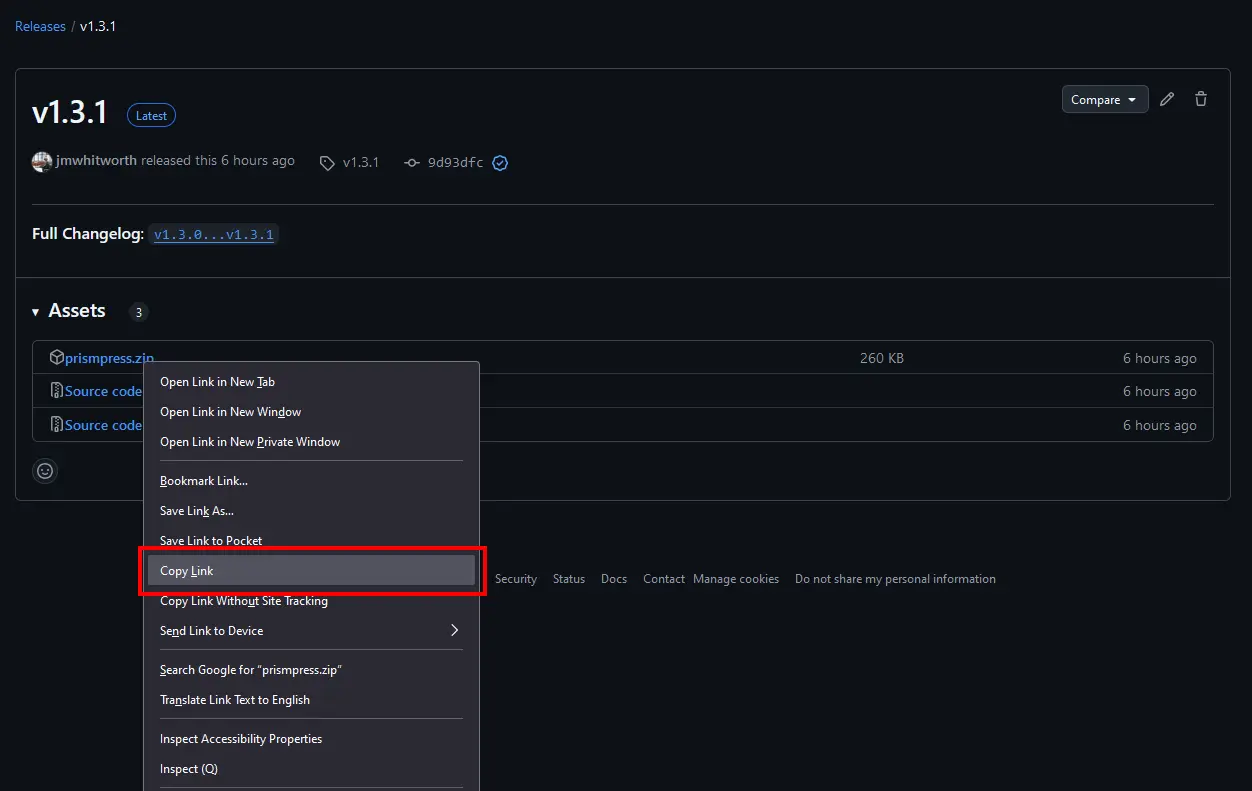
Finally, here’s the last piece of the puzzle. With your release created, you’ll see your ZIP file is downloadable. In update-info.json, the package field needs to point to a downloadable ZIP of your plugin. This is what that URL is. You can get it by right-clicking and copying the link:
While it’s a little bit like a chicken-or-the-egg situation, as you can’t really make the release without first having the URL ready, this is only a small issue the first time you go to do this. Once you’ve got the URL, all you’ll need to do is increment it to match the latest version and, so long as your naming is consistent, you’ll have the correct URL each time.
For instance, my URL is https://github.com/jmwhitworth/PrismPress/releases/download/v1.3.1/prismpress.zip. If my next release is version 1.4.0, I’ll know that the URL will have to be https://github.com/jmwhitworth/PrismPress/releases/download/v1.4.0/prismpress.zip. And, so long as I call the release v1.4.0, and upload the prismpress.zip file with the right name, this URL will resolve correctly.
Conclusion
While it might seem daunting, this whole process is actually quite simple. Once you’ve done it once, it’s all clear and easy to understand.
The great thing about using GitHub is its availability and reliability. It removes the fear that changing your server’s URL could prevent updates from happening or the fear of downtime affecting service.
While it might be easier for some to upload to the WordPress repositories, for my smaller plugins that are only on a handful of websites I manage, this makes sense.
I hope you found this useful. If you have any thoughts or questions, let me know by leaving a comment below.
Leave a Reply