
I recently switched from Plesk to Dokploy as the platform on my VPS for hosting websites. I did this because I felt Dokploy offered more control, leaning into the Docker and build packs approach utilised by many hosting services such as Heroku or Netlify. It is self-hosted and adds no costs beyond my regular VPS bill.
The one complication this created for me was the fact that Dokploy doesn’t facilitate any email hosting out of the box. This meant I had to get my hands dirty. My go-to process in any situation which involves hosting a service for the first time is turning to Dockerhub and seeing what’s out there.
docker-mailserver
docker-mailserver is ‘A production-ready fullstack but simple containerized mail server (SMTP, IMAP, LDAP, Anti-spam, Anti-virus, etc.)’. I’d never used it before, but their documentation is excellent, so I had very little trouble in getting everything configured.

Setting up the docker-compose for docker-mailserver in Dokploy
In Dokploy, set up a new project called ‘Mailserver’, or something else you prefer, and add a new service with the ‘Compose’ option. You can then add a docker-compose configuration
services:
    mailserver:
        image: docker.io/mailserver/docker-mailserver:latest
        container_name: mailserver
        restart: always
        hostname: ${MAIL_DOMAIN}
        ports:
            - 25:25
            - 143:143
            - 465:465
            - 587:587
            - 993:993
        volumes:
            - ../files/dms/mail-data/:/var/mail/
            - ../files/dms/mail-state/:/var/mail-state/
            - ../files/dms/mail-logs/:/var/log/mail/
            - ../files/dms/config/:/tmp/docker-mailserver/
            # For Traefik letsencrypt certs
            - /etc/dokploy/traefik/dynamic/acme.json:/etc/letsencrypt/acme.json:ro
            - /etc/localtime:/etc/localtime:ro
            # For DKIM
            - ../files/dms/opendkim:/tmp/docker-mailserver/opendkim/
        environment:
            - ENABLE_CLAMAV=1
            - ENABLE_FAIL2BAN=1
            # If letsencrypt for SSL/TLS certificate is used (otherwise adapt)
            - SSL_TYPE=letsencrypt
            - SSL_DOMAIN=${MAIL_DOMAIN}
            - TZ=Europe/London
        cap_add:
            - NET_ADMIN # For Fail2Ban to work
            - SYS_PTRACE
For the above to work, you’ll need to set an environment variable of MAIL_DOMAIN to be equal to your desired domain. For example, I might use mail.jackwhitworth.com. This shouldn’t include any protocol such as https, or any trailing forward slashes.
You should also ensure that all of the forwarded ports within the compose file are also open in your firewall on your system so that traffic is allowed. If you do not open all of these ports on your firewall, it’s likely that either some or all of the mailserver’s functionality will be inhibited or blocked.
I’ve added some comments to help add context to what everything does. Line 19 mounts the host machine’s acme.json file within the container so that the mailserver can load the certificate which is generated by letsencrypt via Dokploy. Line 22 mounts the directory where DKIM records are stored once generated. These are essential for ensuring your emails aren’t marked as spam. I’ll explain what to do with these shortly.
With this compose configuration in place and the MAIL_DOMAIN environment variable declared, you can now start the container once so that it can be built. Once built, you’ll then be able to declare a domain for the service by clicking on the ‘Domains’ tab and then setting it up as you would with any other app. The ports you assign here aren’t really important as they’re exposed on the host machine’s ports anyway and aren’t being accessed directly by the domain. But by adding the domain, Dokploy’s Traefik service will generate an SSL certificate for it via LetsEncrypt. It’ll then be accessible by the mail server, thanks to the volumes we set up earlier. Once the domain is added, you’ll can restart the service, and the logs shouldn’t show any SSL errors.
Creating mail accounts
You’ll need terminal access to the service to create an email account for docker-mailserver with Dokploy. You can do this by either connecting to the server via SSH directly or by accessing the terminal for the service’s container via Dokploy’s GUI.
The method you use to connect to the terminal session will alter the command you’ll use. If you SSH onto the machine, your commands will begin
docker exec -it <CONTAINER NAME>. Whereas if you connect to the container directly, this won’t be neccessary.
You can create an account by running the following command (As detailed in their documentation):
docker exec -it <CONTAINER NAME> setup email add [email protected](Or, if you connect directly to the container, you can start from the setup part.
If you run
setup help, you can see a list of all supported commands.
DKIM, DMARC & SPF records
Generating DKIM records
In all honesty, I’m just going to give a quick rehash of what is already very well documented as a part of docker-mailserver’s documentation. Instead of going massively into details here, I’m going to give you the solution on my part, but if you don’t understand the ‘why’ or find you’re not quite sure, please check that link out right away, as it’s the best place to see exactly what to do.
Assuming you now have the mailserver container running, see no errors regarding the SSL, and have created your mail accounts using the command I provided in the last section, you can now generate your DKIM by running:
docker exec -it <CONTAINER NAME> setup config dkimThis will create a DKIM record for each unique domain that has a mail account within your server. You can then locate these records as per the volume we mounted on line 22 of our docker compose config. If you navigate to the /etc/dokploy/compose/<app directory>/files/dms/opendkim/keys/ directory, you’ll see a folder for each domain you have. Within each folder is both a mail.private file and a mail.txt file. The latter, mail.txt, contains the record value which you’ll set up on your domain’s DNS records. This is essentially a way for you to prove to the server that it’s your domain and that it’s allowed to send emails using its name.
After generating any DKIM records, you must always restart the container for them to take effect.
The record must be formatted in a specific way. For example, if the file content reads:
mail._domainkey IN TXT ( "v=DKIM1; k=rsa; "
"p=MIIBIjANBgkqhkiG9w0BAQEFAAOCAQ8AMIIBCgKCAQEAqQMMqhb1S52Rg7VFS3EC6JQIMxNDdiBmOKZvY5fiVtD3Z+yd9ZV+V8e4IARVoMXWcJWSR6xkloitzfrRtJRwOYvmrcgugOalkmM0V4Gy/2aXeamuiBuUc4esDQEI3egmtAsHcVY1XCoYfs+9VqoHEq3vdr3UQ8zP/l+FP5UfcaJFCK/ZllqcO2P1GjIDVSHLdPpRHbMP/tU1a9mNZ"
"5QMZBJ/JuJK/s+2bp8gpxKn8rh1akSQjlynlV9NI+7J3CC7CUf3bGvoXIrb37C/lpJehS39KNtcGdaRufKauSfqx/7SxA0zyZC+r13f7ASbMaQFzm+/RRusTqozY/p/MsWx8QIDAQAB"
) ;
Then you should reformat it to:
"v=DKIM1; k=rsa; p=MIIBIjANBgkqhkiG9w0BAQEFAAOCAQ8AMIIBCgKCAQEAqQMMqhb1S52Rg7VFS3EC6JQIMxNDdiBmOKZvY5fiVtD3Z+yd9ZV+V8e4IARVoMXWcJWSR6xkloitzfrRtJRwOYvmrcgugOalkmM0V4Gy/2aXeamuiBuUc4esDQEI3egmtAsHcVY1XCoYfs+9VqoHEq3vdr3UQ8zP/l+FP5UfcaJFCK/ZllqcO2P1GjIDVSHLdPpRHbMP/tU1a9mNZ5QMZBJ/JuJK/s+2bp8gpxKn8rh1akSQjlynlV9NI+7J3CC7CUf3bGvoXIrb37C/lpJehS39KNtcGdaRufKauSfqx/7SxA0zyZC+r13f7ASbMaQFzm+/RRusTqozY/p/MsWx8QIDAQAB"This means taking the content between the two brackets (including the outer "), stripping any " from the middle of the content, and then making it all one line. If this isn’t quite clear, this is more clearly detailed in the docker-mailserver documentation, as mentioned earlier.
Adding Records To Your Domain
The exact step-by-step for adding DNS records depends on your host. I’m going to assume you know how to manage your DNS for your domain. If you don’t, I’d recommend reading up on it for your current registrar.
For this example, let’s imagine I’m setting up a mailserver for, domain-one.com. The mailserver itself will be hosted under mail.domain-one.com.
The following records are required:
| Type | Name | Content |
|---|---|---|
| A | mail.domain-one.com | <server ip address> |
| MX | domain-one.com | mail.domain-one.com |
| TXT | _dmarc.domain-one.com | "v=DMARC1; p=quarantine; rua=mailto:[email protected]" |
| TXT | domain-one.com | "v=spf1 ip4:{SERVER_IP} ~all" |
| TXT | mail._domainkey.domain-one.com | <DKIM for this domain from previous step> |
You’ll notice that the DMARC record references [email protected]. This is an email address you can provide for where your DMARC reports are forwarded to. These are small, daily emails which come through with a deliverability summary for the domain. It’s generally a good idea to have a dedicated email address to receive and archive these, but it’s not a requirement for this to work.
Adding DNS Records For Other Domains
So what if you’re hosting emails for another domain under your server? So your mailserver’s host is domain-one.com, but the sender domain is domain-two.com. In that case, the records for domain-one.com will be the same as my example above (swapping out the various jackwhitworth.com references for the correct domain, of course. But we’ll also need to add some records to domain-two.com to verify that we want the other domain to be able to send emails on our behalf. The records you’ll need will look as follows:
| Type | Name | Content |
|---|---|---|
| MX | domain-two.com | mail.domain-one.com |
| TXT | _dmarc.domain-two.com | "v=DMARC1; p=quarantine; rua=mailto:[email protected]" |
| TXT | domain-two.com | "v=spf1 include:domain-one.com ~all" |
| TXT | mail._domainkey.domain-two.com | <DKIM for this domain from previous step> |
You’ll see that the primary difference is that the SPF record references domain-one.com instead of the IP address of the server. This is because in the case of domain-one.com, the server was sending the emails on its behalf. But in the case of domain-two.com the first domain is a middle man.
Logging In With The Email Accounts
We’re on the last stretch now. Let’s log in!
You can use various programs: Windows Mail, Thunderbird, Gmail client (for Android/IOS), or one of an almost unlimited number of other options.
SMTP Settings
SMTP handles the outgoing traffic. To connect, you can use the following as an example, but update the domain and email to match your deployment.
| Field | Value |
|---|---|
| Server address | mail.yourdomain.com |
| Port | 465 |
| Security | SSL/TLS |
| Username | [email protected] |
| Password | <What you set when creating the account> |
IMAP Settings
IMAP handles the incoming messages. They’re stored on the server and synced across to your client devices from that remove storage.
| Field | Value |
|---|---|
| Server address | mail.yourdomain.com |
| Port | 993 |
| Security | SSL/TLS |
| Username | [email protected] |
| Password | <What you set when creating the account> |
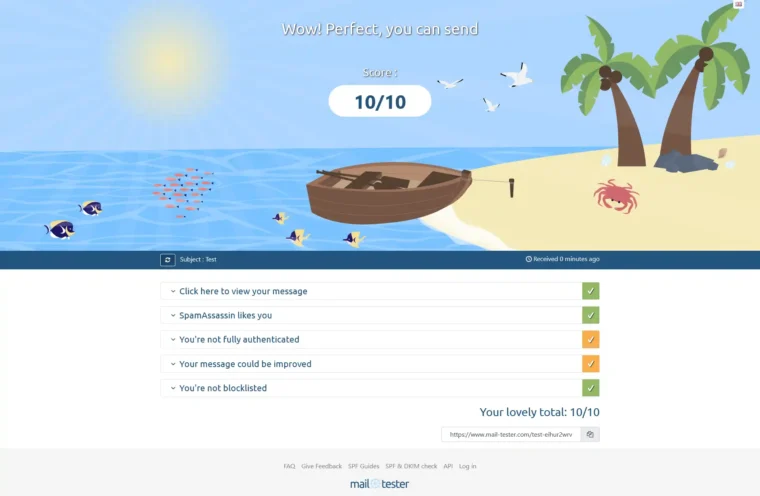
Testing Your Server’s Deliverability
To test the deliverability of emails, I like using the following service: https://www.mail-tester.com/
It’s free to use for 3 checks a day. It determines the number of checks by your IP address, so if you need one or two more, you can always try using a VPN or your mobile phone’s network to change up your IP to squeeze a few more runs out of it.
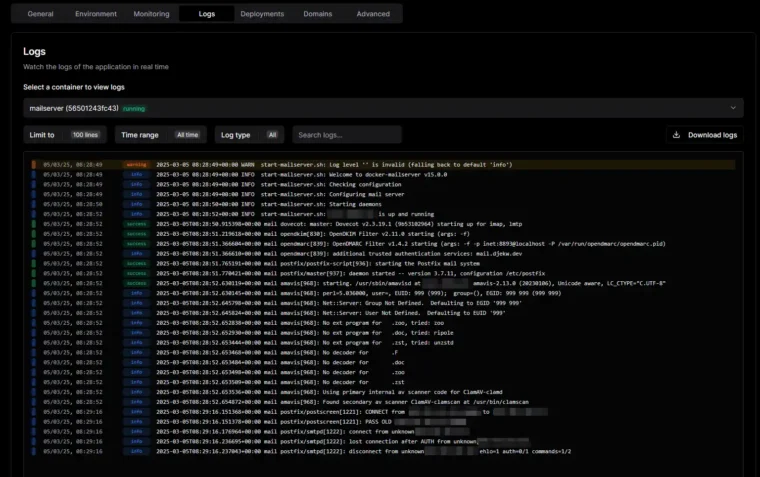
Troubleshooting
I’m seeing SSL errors in the container logs
If you’re seeing SSL errors, make sure that you’ve attached the correct domain and that your MAIL_DOMAIN environment variable is set on the container. If both of these are done, use SSH to check the /etc/dokploy/traefik/dynamic/acme.json file on your host machine references the domain you’re using. You can do this easily with the following command:
cat /etc/dokploy/traefik/dynamic/acme.json | grep yourdomain.comIf the output doesn’t contain your domain, then there is some issue which means Traefik doesn’t have a certificate available.
My deliverability score isn’t 10/10
There isn’t an exact answer that I can provide to this, as there can be a large variety of issues. Something which can catch people out is their server’s IP being on a blocklist. As VPS providers recycle IP addresses, if you’re unlucky and get given an IP that someone else has used to send spam before, then you may suffer as a result.
Fortunately, mail-tester.com provides a clear report of your deliverability. If You’re not scoring 100%, it’ll explain exactly why, including the situation where you’re on a block list. You can request to be removed from most lists, but you’ll need to research this on a case-by-case basis.
I don’t understand SPF, DMARC, and DKIM records
These are DNS records which attach to your domain and detail how the domain should handle email traffic. As emails use a distinctly different system than standard HTTP requests, they have their own rules beyond standard A records. The MX record points your domain to the subdomain which runs the mailserver. The SPF record specifies who/what can send emails on behalf of the domain. The DMARC record indicates how to handle the DMARC report, which is a summary of deliverability. The DKIM record is a final validation where a DKIM record is generated on the server in 2 parts: a public and a private key. The public key is attached to the domain, and the mail server can match this against its private key to validate that it’s using the correct domain. The SPF and DKIM records server confirm to both the server and the domain that the other is verified.
Leave a Reply